
When I see images like this that make an impression on me, I make a point of "saving" them in the file in my noggin' that I go to when I frequent my favorite thrift stores. I try and look at every ugly old piece of furniture or lamp as if it already had a fresh new coat of paint on it and been repurposed into something useful again. To find these ideas, I flip through those "saved" images to help me imagine what the item could be, not what it is in its present state.
With that being said, a few weeks ago I noticed an old TV console in a pile of trash and yard debris that someone had dumped on the side of the road near my Mom's house. Every time I drove past it I was in my car (Honda Civic) with nowhere to put it, but I told my Mom that I wanted it and I was going to make it into something awesome again! (She thought I was kidding) It just so happened that I was driving Dustin's truck this past weekend doing farm chores (picking up hay, sand for the chicken coop, new chicks, etc.), and Mom was riding with me, so when we rode by the console again, I hopped out and she helped me load it into the back of the truck. Score! Even luckier for me, the TV screen and insides just fell right out when we picked up the console, so I didn't have to worry with taking that part out. It was perfect (It even has wheels!!). Perfect, but ugly..

The first step was to sand it down. It had been out in the rain and elements for a few weeks, so there was some water damage and other issues that we fixed with the help of an electric sander. This could have been accomplished with a sanding block, it would have just taken much longer. I had to get into the small spaces by hand, but after a good sanding and blowing away dust with the air hose, it was already looking much better!

In these photos I had already taped off the parts I wanted to keep original with blue painter's tape after it was sanded. My Mom and I set it on top of the sawhorses to make it easier to paint and so we could be sure and get all the edges.

The next step was spraypaint! I've used many different kinds of spray paint on projects over the last few years, but in my experience you can't buy anything better than Krylon's Color Master spray paint. It works on virtually any surface, dries fast, and has a nifty nozzle that lets you have control over the direction of your spray. And for around $3 a can at WalMart, you definitely can't beat the price! For this project I used three cans of the Blue Ocean Breeze color.

Here it is all painted! (It was almost dark at this point, so we had to move the project into the garage to finish)

While the paint was drying, we started working on the back of the console. I bought some really cute black and white damask fabric at WalMart when I bought my spray paint, and the plan was just to staple it with a staple gun across the back of the console. However, Mom and I decided it was a much better idea to mount it on a piece of cardboard first, then staple it to the back. Putting it on the cardboard was way easier than buying and cutting a piece of wood, and it would make it easier to change out decorations on the inside of the bed since I could just use push pins instead of nails. We used a cheap bottle of tacky glue we found in the craft section to glue it to the cardboard. We then glued fabric on the inside walls of the console using the same tacky glue. It went up easily, similar to hanging wallpaper.
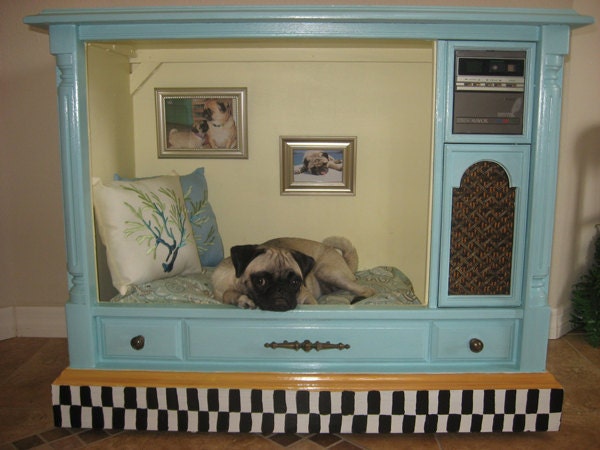
For the inside decorations, I bought these two cheap 4x6in. photo frames in a 2-pack at WalMart for $2, and I already had the little plaque at home packed away in a box. (I'll have to get into my tales of being a hoarder from working at Hallmark for the last 7 years! lol..I'll save that for another day)

For the bottom of the bed, I used a queen sized pillow with a plain white pillow case for the bedding. To add light, I bought a tap light (I got that at WalMart also for around $5..those things are way more fancy than they used to be-it has LED bulbs and a timer..lol) I used velcro dots to secure it to the top and make it easy to change out the batteries. Here's the final product with Miss Ella herself checking it out!

She'll do anything for a treat :)

The before and after..what a transformation! Big thanks to my mom on this one for being such a big help! We had a lot of fun on this project and spending time together, and I couldn't be happier with how it turned out!

Even more impressive, my total cost for this project with fabric, glue, spray paint, light, and photo frames was around $20!
No comments:
Post a Comment